-
Circles

Circles. Copyright © 2017 Gary Allman, all rights reserved. Another personal edit taken from last week’s event.
Inner circle, outer circle, circle of friends, circle of trust, running in circles, circles … everywhere.
-
Late Arrivals

Late Arrivals. Copyright © 2017 Gary Allman, all rights reserved. This photograph is begging to have its story told. Which is appropriate given the name of the venue — Storybook Barn. I wonder what that story might be?
Notes. Every now and then I feel that I may have hit my photographic jackpot. I think this might be one of those times. The composition of this picture is mine. The couple walking into the frame at just the right moment as I was taking it; unplanned and perfect. I’ve released the color version, which I also like, to the customer. However, my creative side insisted that I also make this personal black and white edit. Film noir? I don’t know, maybe. That’s up to you to decide.
-
Sprinky — Variations

Sprinky – Variations: My Favorite Sprinky was on the kitchen table performing a very good impression of a ‘Flat Cat.’ Flat Cat is a term we use to describe the Maine Coons’ habit in warm or hot weather of trying to meld with a cool surface. They do this by maximizing their surface area in contact with the object they are laying on, giving them a flattened appearance.
I saw the picture as I was ‘getting my steps in’ on one of my regular walks around the house. Unfortunately, when I returned to the kitchen, camera in hand, Sprinky woke up and started taking an interest in what was going on. So no flat cat picture.
It was only when processing the picture I realized just how old Sprink is starting to look. She is allowed, she’s fifteen, on various meds, and a survivor of fifteen+ bb gun pellets, several of which she still carries, as the vet felt that the operation to remove them would be too dangerous. (aside: the person who shot her has had a stroke and is now confined to a wheelchair. I — not so — secretly hope she’ll outlive him).
I decided to use this picture for a processing experiment and produced five different variations.
Above – My Favorite Treatment
In addition to the cropping and the removal of a distracting mark on the wall that I applied to all the variations; this picture uses the Fuji Camera Classic Chrome Profile, additional sharpening, the contrast has been increased and stretched using shadow uplift and highlight reduction; I’ve applied a slight vignette (I’m addicted to vignettes at the moment) and I warmed the white balance.
Out of Camera

Sprinky — Variations: Out of Camera This picture is straight out of camera with standard Adobe raw image processing apart from cropping and the removal of a distracting mark on the wall.
Black and White

Sprinky – Variations: Black and White Who cannot like a black and white picture? I took my favorite version, converted it to black and white. The image needed to be lightened more and the blacks enhanced. I didn’t need to selectively adjust the different color channels.
Aged Photograph

Sprinky – Variations: Aged Photograph This and faux Lomo are my favorite ‘cutsie’ treatments. The contrast has been reduced and the black level raised using Tone Curves, and Split Toning applied — blue to the shadows and yellow to the highlights.
There is another aged photo effect — which involves lightening the picture, reducing the contrast and really boosting the magenta content, but I didn’t produce a version with that effect.
Bleached Portrait

Sprinky – Variations: Bleached Portrait This appears to be one of the most popular modern processing effects. And I’ll have to say it works a lot better with back-lit portraits than cats lying on a table in a dark kitchen. The contrast has been reduced and the black level raised using Tone Curves, no split-toning, and no vignette. I confess that the wide adoption of this processing technique is one reason why I decided not to venture back into commercial photography. In small doses, it is fine — but whole albums of it? I suspect that in twenty years’ time a lot of recent brides and grooms are going to wish they’d opted for more traditional processing of their wedding pictures.
-
Cross

One of Jim’s Cross Sculptures The latest of Jim’s Cross inspired artworks.
It’s an interesting departure from his usual flower and tree inspired forms.
-
How did we get here, and where are we headed?

May 2010 Car Camping at Blue Spring | August 2017 Backpacking and wild camping on the Ozark Trail Back in 2010 our outdoor recreation goals very quickly evolved. Within three months of our first-weekend camping trip, we’d bought kayaks to get out on the lakes, and in less than six months we went from car camping to backpacking and hiking.

Camping at Big Bay Campground, Shell Knob, Missouri. Copyright © 2010 Gary Allman, all rights reserved From the start we had difficulty finding campgrounds and sites as they are managed by different organizations. Corps of Engineers, National Forest, and State Parks (ignoring the private campgrounds). Each has their own website and booking system. Our original plan for our Ozarks Walkabout website was to document all the campgrounds, hikes and other recreational outdoor activities in the Ozarks and make the information available in one place. We also wanted to encourage people to use these facilities before they are lost. In the process, we wanted to help people get out and enjoy nature in a responsible manner.
We had some outline plans to monetize the site, but those were sunk on several counts. The first was Missouri passing a tax law that meant we couldn’t benefit from online sales via Amazon. Then we noticed a whole bunch of start-ups providing similar facilities to those we were thinking of, and finally, our business insurers refused to have anything to do with us if Ozarks Walkabout was to join our existing business portfolio.

Packing for camping – We are Organized. Copyright © 2010 Gary Allman, all rights reserved. We liked having the Ozark Walkabout site though. It gave us another reason to get out and document what we were doing and help others wanting to “Get out and about in the Ozarks.” so we’ve kept paying to keep the website running, and we continue to update it, even if that is somewhat erratically.

Pines Overlook Campsite at night. Red Bluff Campgound, Davisville. Copyright © 2010 Gary Allman, all rights reserved. 
Our first stop at the top of Coy Bald looking over toward Lower Pilot Knob (the tallest of the hills in the distance). The knob is also in the Wilderness area, which gives some idea of its size.Copyright © 2010 Gary Allman, all rights reserved. However, that doesn’t explain how we progressed from car camping to backpacking in such a short space of time. Looking back it was probably fueled by a poor choice of campgrounds. What struck us, was that a large number of people at the campgrounds were hell-bent on partying, making noise, and having a good ol’ time. Nothing really wrong with that, but what we wanted was peace, quiet, and a chance to get back to nature and recharge. Our first fix for this was to go car camping mid-week when all the partying folks were at work. Camping mid-week we had the pick of the campsites and sometimes we even had entire campgrounds to ourselves. However, that wasn’t a practical long-term solution as we still have to work too.
“What if,” we mused, as we sat around the campfire, “we could pick up our camping stuff and carry it a mile or so into the wilderness and get away from the noise and people?” Thus began another of our favorite activities – research. We read voraciously about backpacking. We decided that ultralight backpacking was not our style, and started making lists of what was needed to go backpacking in earnest.

Our first wild camping campsite – Hercules Glades Christmas Break 2010. Copyright © 2010 Gary Allman, all rights reserved. We carried on car camping through the summer of 2010, and bought a new lightweight backpacking tent in November along with zero degree sleeping bags, a water filter and what, at that point, I considered a backpacking stove. I already had a backpack though we found a much better one in an online sale, so we bought that. Ginger got her Deuter pack and we were ready for a ‘practice run’ at the Berry Bend campground before venturing off backpacking. At that point we’d not hiked in the wilderness, so we signed up for a group hike at Hercules Glades with MDC.
The arrival of our replacement sleeping bags (we returned the first ones we bought) coincided with a break in the weather, and we went off on our first backpacking trip. I dread to think what my pack weighed. 40-45lbs? (actually only 38lbs) Over time we’ve reviewed what’s worked and what hasn’t. What’s heavy and we can manage without, and what luxuries we are prepared to carry. That latter list has shrunk considerably over the last year or two. We also found that we can car camp just as well with our backpacks, which minimizes the amount of gear we have to keep track of and manage.
Backpacking was just what we wanted, it got us away from the crowds and the noise. Though somehow we never got to the point where we just hiked off into the wilderness, planted our tent and stopped to just enjoy nature and doing nothing.

Where did you go to watch the Eclipse? We camped in the Mark Twain National Forest. Copyright © 2017 Gary Allman, all rights reserved. Our biggest problem remains time. I work half-time as a Director of Communications, and we are both self-employed (anyone who is self-employed will know that our ‘bosses’ are really demanding slave drivers). We look longingly at people in nine-to-five jobs who are able to plan their weekends and evenings away from work. We are also at that stage in life where family demands on the one-hand are dwindling as kids gain their independence, but family commitments seem to crop up every year, what with births, marriages etc. When half your family lives on the other side of the Atlantic that can take quite a large chunk of time and a huge financial toll.
That’s why we don’t get out as much and post on Ozarks Walkabout as often as we might.
So where are we headed? In 2016, we reviewed what was putting up roadblocks to our getting out, and we did some simple fixes. At home, we’ve been decluttering and fixing things up to be more space and time-efficient. At work we are aware of the need to address the mythical “work-life balance” and we both claim that we want to get out on the trails and lakes more often.
The difficult bit is proving to be working out how to translate that into action.
-
Gary vs The Drier (Again)
 The connection (left) probably came loose causing it to overheat and ultimately fail.
 A blurry cellphone picture of the burnt-out mains connector block in the tumble drier.
I was told that there was a blue flash and a bang, and the dryer stopped working.
It didn’t take long with my faithful multimeter to work out there was an open circuit on the drier power supply — no real surprises there. The extent of the damage was quite impressive though. One of the wires and the mains connection block was damaged. The block had melted and the insulation was burned off of the wire.
For a small component, the connection block was surprisingly expensive to replace (Over $30.00). The repair wasn’t helped or speeded up by needing a special tool to crimp the cables onto the spade connectors.
I guess I need to make a diary note to check the connections once every now-and-then, as my best guess is that the problem was caused by the connection coming loose and overheating due to arcing.
-
Gary on the Berryman Trail

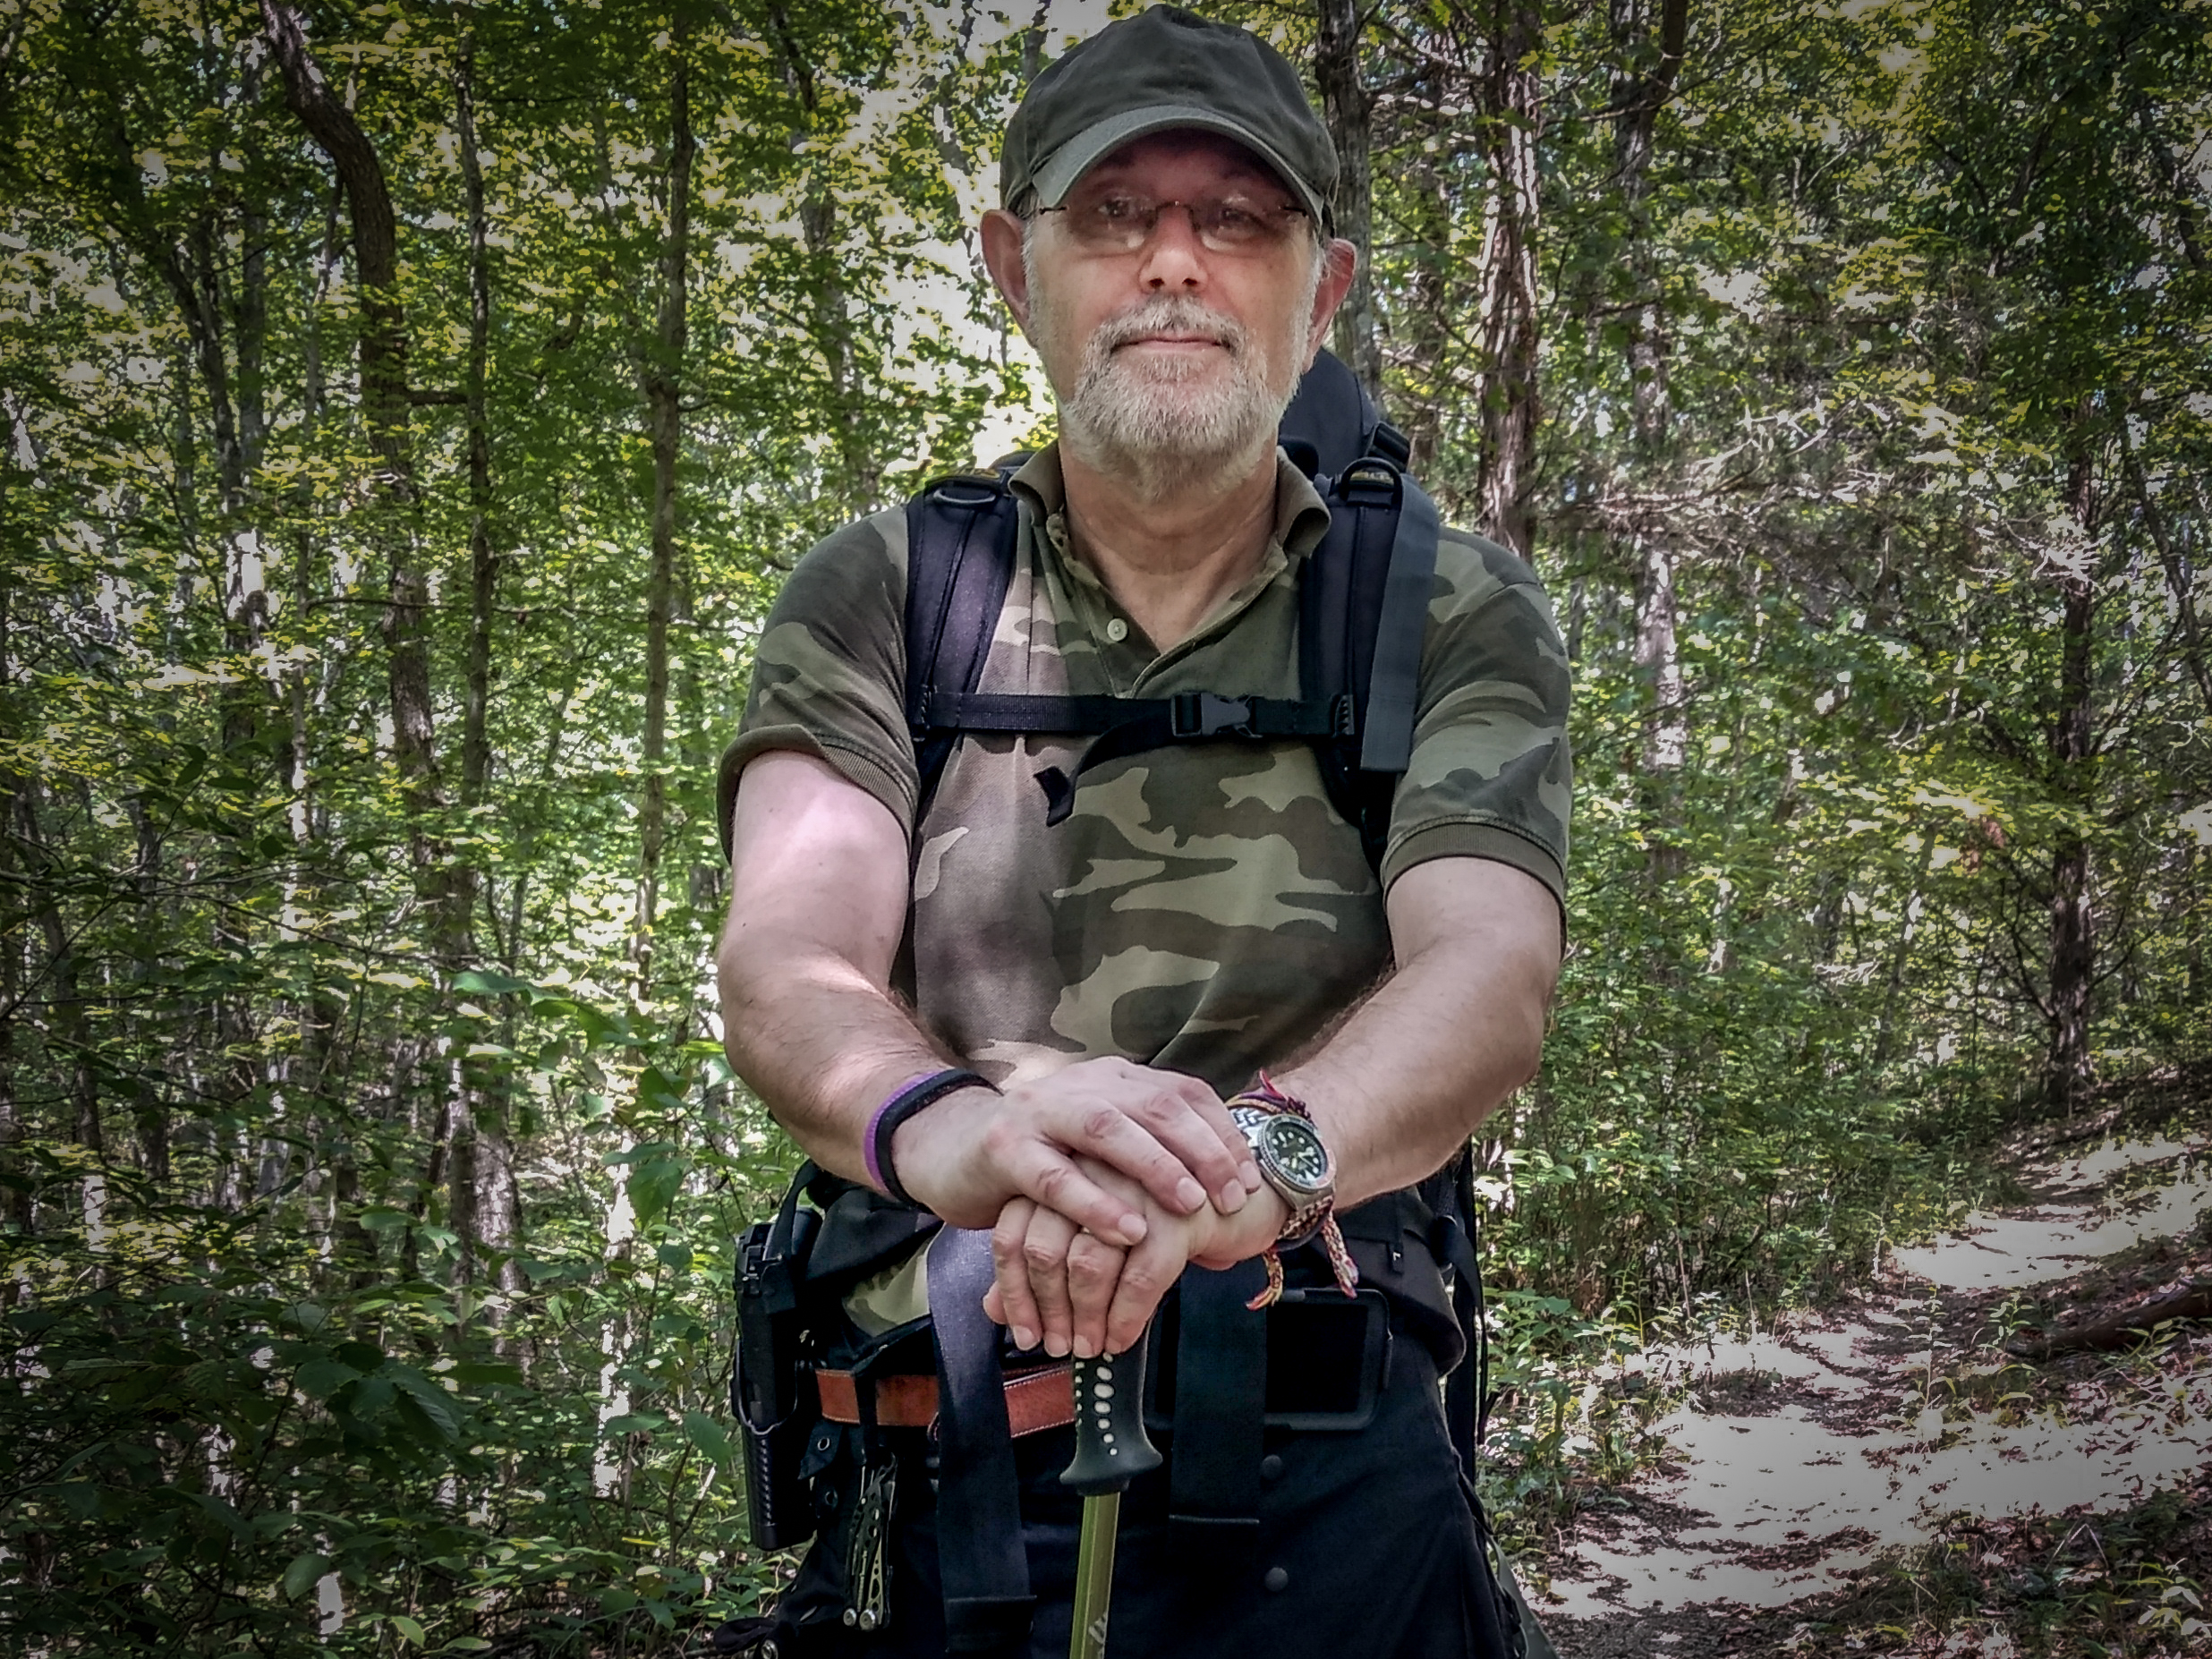
Gary (looking amusingly tacticool) on the Ozark / Berryman Trail Copyright © 2017 Ginger Allman, all rights reserved 
Gary on the Ozark / Berryman Trail Copyright © 2017 Ginger Allman, all rights reserved. A serious-looking Gary on the Ozark / Berryman Trail, on the “2017 Total Eclipse Backpacking Trip”. It was hot, humid, and buggy. Just how buggy we didn’t realize until we got home. We removed 11 seed ticks from my toes alone. As to Chigger bites …
We knew about the seed ticks, as Ginger noticed we’d gone through a nest. We didn’t know about the chiggers. I picked them up back at the parking lot. A van was parked across the trail exit so we cut across a load of grass. At the time I thought it’d be bad to pick up some chigger bites on the final few yards of the hike. Bad it was – I ended up with hundreds of bites (unfortunately not an exaggeration – TMTC -Too Many To Count) and a miserable few days recovering.
What is stunning is that neither of us thought to apply Deet when we knew we’d just crossed a nest of seed ticks.
That’s a lesson I’ll remember for a while.
I should add that the utility kilt & huaraches were both excellent in the hot and humid conditions. I highly recommend both for hiking / backpacking, if you have the nerve.
-
2017 Total Solar Eclipse Backpacking Trip

Total Eclipse in the Mark Twain National Forest. Copyright © 2017 Gary Allman, all rights reserved. We went eclipse backpacking on the Ozark Trail.
The eclipse was more popular than I anticipated. My plan had been to wait until seven days before the event and pick a destination. I picked seven days because the weather forecast would be more reliable. Unfortunately, waiting that late meant that everything was already booked (and had been for ages). To make matters worse the traffic predictions were not encouraging.
I didn’t fancy driving to Kansas City on the day, and Ginger didn’t want to travel on single lane roads either. I was left with a last minute dilemma of where to go.
Our new plan was go the day before and stop at the Berryman trailhead campground
I checked for wildernesses along the path of totality and noticed that the Ozark Trail / Berryman Trail was nine miles inside the track. Our new plan was go the day before and if there were any sites available, stop at the Berryman trailhead campground. Berryman is walk-in only, so no one can book in advance. If the campsites were all occupied we could head off down the trail a while and wild camp off-trail. I’d even earmarked a potential point to start bushwhacking a mile or so from the trailhead. We’ve not been hiking recently and predicted 90°F+ temperatures meant I didn’t want us (me) to be hiking too far.
I ‘phoned in and extended the rental on the car Ginger’s had for the past couple of weeks; Ginger has been touring the country, primarily on business, since August 7. She arrived home on Saturday August 19. Just enough time to confirm plans and pack our backpacks ready to get back on the road Sunday.
Sunday’s trip to the Berryman Trail trailhead was uneventful. In fact all I needed to do was say, “Okay Google, take me to Berryman Campground” and that was enough for the GPS to get us there. Though we did lose the GPS signal at one point. The traffic while not light wasn’t too busy either.
We last visited the Berryman Trail in March 2011. The trailhead campground was very much the way we remembered it, except it was full to overflowing, with tents appearing on spare bits of grass. Backpacking along the trail it was to be then.
My plan was to follow one of the creeks that crossed the trail up a hollow looking for a flat spot on the ‘flood plain’.
We left the car at the Berryman Campground trailhead parking lot and set off north along the Ozark / Berryman Trail. It was obvious from the surface that the trail hadn’t been used much recently. There was very little sign of tracks from bikes, horses or hikers. In our time on the trail we only met one other couple going in the opposite direction (south).

Trail Sign for the Ozark / Berryman Trails. Copyright © 2017 Gary Allman, all rights reserved. My plan to follow one of the creeks off trail didn’t work out, as in reality the hollows were too narrow and there was little to no water in the creeks either. The trail seems to have been re-routed since our first trip, and we never encountered the creek crossing I was looking for.
Talking about the trail being re-routed – it varies a fair bit from the trail portrayed on the official USDA map. If you want a good map I recommend the Ozarks Trail Map – which includes the complete Berryman Trail loop. This map provides a detailed view of the trail. I wish I’d found the Ozarks Trail map before we went. Instead we took the much inferior USDA Berryman Trail Brochure map.
Conscious of the time, distance, and heat, we picked a likely looking ridge that offered the chance of some flat spots, and bushwhacked up off of the trail. The tree canopy cover was fairly dense so there was not a lot of ground cover. We bushwhacked 300-400 yards off the trail before we found a spot that worked. The main problem in finding a spot was the large number of dead standing trees – which we didn’t want to be near. We’ve camped twice in the wilderness when a tree has come down nearby, so we always try to remember to look up and around.
Where did you go to watch the Eclipse? Mark Twain National Forest. Copyright © 2017 Gary Allman, all rights reserved. Between us we had five liters of water and that was going to have to last until we got back to the car – where we had several more liters stashed in a cool box.
Checking out the lie of the land and the tree canopy, it looked like we’d be able to get a clear view of the eclipse – plus I knew that the tree cover would provide an excellent surprise to Ginger on the run up to the totality.
The only problem I had was finding a suitable place for the food bag. None of the trees had strong branches below about forty feet. After much scouting around I discovered a fallen tree that I could hang the food bag from.
 Early Morning – Wild Camping in the Mark Twain National Forest. Copyright © 2017 Gary Allman, all rights reserved.
 It’s amazing how well the tree cover stops the undergrowth growing in the forest. I was quite happy barefoot around our camping spot. Copyright © 2017 Gary Allman, all rights reserved.
 That’s where all the fun will be happening … Copyright © 2017 Gary Allman, all rights reserved.
 Fungi
Fungi Leaves of three let it be. Copyright © 2017 Gary Allman, all rights reserved.Only this is harmless.
 You Parked Here. Copyright © 2017 Gary Allman, all rights reserved.
 Eclipse Campsite in the Mark Twain National Forest – Berryman / Ozark Trail. Copyright © 2017 Gary Allman, all rights reserved.
 View From Our Tent. Mark Twain National Forest – Look carefully and you can see our food bag away in the distance. Copyright © 2017 Gary Allman, all rights reserved.
After we had settled in I was surprised to hear a vehicle, and even more surprised to catch a glimpse of the top of it moving through the trees at the top of the ridge. We’d climbed up higher than we’d thought and were within a hundred yards or so of one of the forest roads. The vehicle stayed nearby (I guess at the end of the forest road) all night. We knew they were nearby but I doubt they had any inkling we were there – which did give us a moment of concern when they indulged in some target practice – fortunately on the other side of the ridge. They cleared out first thing in the morning, and we’d not felt it necessary to make them aware of our presence. Had a stray bullet come in our direction that would have changed very quickly.

Forest Sunrise. Copyright © 2017 Gary Allman, all rights reserved. Monday morning we lazed around waiting for the start of the eclipse, packing everything away just before it was due to start. We planned to take advantage of the slight cooling down during the eclipse and hike out as soon as the totality was over.
Watching an eclipse from the middle of a forest is special. Ginger had mocked me for making sure I had my headlight to hand – this was my second total eclipse – so I knew how dark it was going to get, and knew it would be even darker under the trees. I didn’t use the headlamp, but it did get very dark. The trees gave a fantastic display of crescent lights, and the total eclipse was breathtaking seen through the canopy of the trees. Being only nine miles into the track of the eclipse, the period of totality was quite short, and it wasn’t very long before it was light enough to start hiking out.
 No Eclipse Glasses? Use a watch strap instead.. Copyright © 2017 Gary Allman, all rights reserved.
 Copyright © 2017 Gary Allman, all rights reserved.
 komorebi – A Cool Eclipse Effect. Copyright © 2017 Gary Allman, all rights reserved.
 Is it day or is it night? Copyright © 2017 Gary Allman, all rights reserved.
 Total Eclipse in the Mark Twain National Forest. Copyright © 2017 Gary Allman, all rights reserved.
I’d like to be able to say that we had an easy hike out; were delayed a bit in the traffic on the way back to Springfield, but all was fine. Well it was. Except.
I’d like to be able to say that we had an easy hike out; were delayed a bit in the traffic on the way back to Springfield, but all was fine. Well it was. Except. Except we managed to get into a nest of seed ticks. Now for some odd reason despite having a full bottle of deet, neither of us had put any on. And we didn’t think to stop and apply it even after we knew we’d been in among the seed ticks. If that wasn’t bad enough, when we got back to the trailhead there was a van parked across the trailhead exit forcing us to cross a couple of open sections of grass. At the time I thought to myself “it’d be horrid to pick up a load of chiggers now…” Crossing the grass was followed by several hours in the car while the GPS computed routes around the stand-still traffic on I-44. Plenty of time for chiggers and seed-ticks to dig in.

Chigger Bites – just a small sample. Copyright © 2017 Gary Allman, all rights reserved. I had a lot of bites. In the hundreds and these weren’t normal chigger bites – these blistered up and were all over me, not just concentrated in folds and crevices. A whole week later and I’m still covered in scabs and blisters. But it was worth it.
Lessons learned
I will not forget the deet in future. Ginger had her share of seed ticks, but the chiggers (or whatever they were) did not cause the same blistery reaction in her, so she got off fairly itch free.
I forgot to turn on the GPS when we started hiking so we had to go on our dead reckoning and a map we quickly realized wasn’t at all accurate to try and determine where we were. Our estimate was pretty close as it turned out. The GPS on my phone includes a general topo map so we were able to confirm our estimated position.
We could have carried in more water – but what we had proved to be enough and we had a filter with us not that we saw much water along the trail.
Gear
The only things we carried and didn’t use were:
- Emergency kit
- First Aid Kit
- Deet!!!!
- Buck hunting knife
- Water Filter
- My sleeping bag – the liner was enough for me
- Spare length of paracord
We took the Mutha Hubba tent, while hiking we discussed whether we should have used a combination of the hammock and our single person tent. I’ve not used the hammock out backpacking yet, and for that reason I’d discounted the idea as I didn’t want the complications. The layout of the trees where we were was ideal for hammock camping, so maybe we should have tried it.
This was the second run out for our Trangia alcohol stove and it worked fine. I’m really liking the simplicity and lack of weight. I’ve now asked Jim if he could solder the lip closed so that we can carry it with alcohol in it without it leaking over everything.
Experimental Items
I’ve read a lot positive reviews and comments about hiking in kilts. In 2016 I bought a utility kilt to wear to my sister’s steam punk wedding. It’s a great (but heavy) kilt, and I thought I might try it out for hiking, but it is made of very heavy cotton and it takes a long time to dry.
Gentlemen, I have to say, if you are brave enough to wear a kilt, you will not regret it … Once tried, there’s no turning back
The thought of that heavy cotton kilt soaked and weighed down with sweat or rain when hiking forced me to the conclusion that it wasn’t a good idea for hiking / backpacking. Mountain Hardware produce a polyester cotton kilt for hiking. But checking the reviews, it was lacking in pleats and restricted movement – more like a skirt than a kilt. So I gave up on the idea. Then a couple of weeks before the eclipse the company that supplied my existing kilt announced a new utility kilt made with polyester cotton rip stop material. Light weight and quick to dry. I bought one and put it through its paces on this trip. Gentlemen, I have to say, if you are brave enough to wear a kilt, you will not regret it especially in the 95°F+ temperatures we encountered. I am now a huge fan, and intend to wear one hiking and backpacking whenever it’s practical. Once tried, there’s no turning back.
However, Ginger says some of the locals may not be so enlightened, so, if I insist on wearing a kilt and huaraches on the trails of the Ozarks I’ll have to open carry. Okay, that’s not a problem. Maybe some ‘rub-on’ tattoos too?
Gary on the Ozark / Berryman Trail Copyright © 2017 Ginger Allman, all rights reserved. And what did I wear under my kilt? My hiking Huaraches of course!
Resources:
Ozarks Trail: http://www.ozarktrail.com/index.php
USDA Berryman Trail: https://www.fs.usda.gov/recarea/mtnf/recarea/?recid=21842Ozarks Trail Map (recommended): http://www.ozarktrail.com/maps/detailed/Courtois3.jpg
USDA Trail Map: https://www.fs.usda.gov/Internet/FSE_DOCUMENTS/fsm8_045355.pdfHiking Kilt: https://www.utkilts.com/lightweight-ripstop-utility-kilts/
Hiking Huaraches: https://xeroshoes.com/shop/feeltrue-products/sensori-venture-mens-barefoot-sandals/
Eclipse Backpacking Trip -
Exit planning
We’re just about finished with the lengthy process of setting up and moving our assets into a trust. As part of that process, we are also having our wills drawn up. Tonight I went on Facebook and asked my family to think about my end of life plans — specifically what to do with all my personal effects.
This was my eldest’s response:

Exit planning discussion on Facebook There are reasons why I hold my family very dear.
-
New definition of incongruous
Earlier this evening. New definition of incongruous. Brit driving an Impala through the Ozarks while loudly singing along with 1970s Canterbury prog. rock. #caravan #cunningstunts
-
Family Barbeque

Family Barbeque. Copyright © 2017 Gary Allman, all rights reserved. Blended families produce large extended families.
And that’s great! Today we were gathered for a barbeque for Mikki and Kyoka who arrived early this morning from Japan. There was lots of good food and company. And, lots of corn – about half a decent sized field’s worth! I was pleased to be able to help polish off the meal with apple pie.
If my memory serves me correctly Mikki and Kyoka were last in the US in 2014. I’m sure someone will set me right if I’ve got that wrong.
-
Sixty Degrees in August …
Did I miss the memo? We seem to have skipped August and September and jumped straight to October. Brrrr.
-
Forty Feet of Blue

Ginger’s Blue Glass Collection Today Ginger filled her new office shelves with her blue glass collection.
The office remodel project is around 80% finished, though we still have half the walls to be painted. This side is complete and we can move stuff over into this half and paint the remainder.
Getting this far took far longer than expected – there was a lot more filling, patching, sanding, and coats of paint than anticipated, but the result is worth it.
All the shelf supports are plastered into the wall, and each shelf could take my weight and more. Preparing the wood we used for the shelves was the biggest unexpected time-consumer. I was going to use prepared wood, but we couldn’t find any of good enough quality the size we wanted. That meant using construction lumber and a lot of sanding and preparation.


I think my drywall patching skills are improving, you really cannot see where we cut out the drywall to fix in the shelf supports and the 24″ x 18″ hole in the wall has disappeared. Magic!
And this is what it looked like after we had started work:

Now the blue glass has been moved from where it was being stored in the garage, my next task is to tackle the garage’s disorganized storage area (or phase IV of the garage remodel, as it might be called. I finished phase III in June 2010, so that’s long overdue too!).
I’m slowly crossing off jobs to be done so I can get to the one I want done, which is to remodel my office.
-
My Weekend – Forty Feet of Shelving
I have my office, Ginger has her studio and my former office space. The office space has been due for remodeling for a long time. My first job has been to install forty feet of shelving to provide a home for most of Ginger’s blue glass. Ginger didn’t want a back on the shelves, and the best idea I could come up with to hide the shelf supports on such a long run was to bury them in the wall. So that’s what I’ve done. Now I’ve got to finish patching the wall ready for the room to be painted. The shelves aren’t finished yet either. l have to sand them down, make and fit hidden shelf end supports, and then paint everything.
Oh, and I’d better remember to patch that huge hole in the wall (The cardboard is to stop inquisitive felines getting under the house).
-
I’ve Been Busy in the Workshop
 Crawl Space Access Hatch and Fan. Copyright © 2017 Gary Allman, all rights reserved.
 The finished desk all cleaned and polished. Copyright © 2017 Gary Allman, all rights reserved.
I completed two projects this week.
The first project was planned, the second project came as a surprise. All in all, I’ve spent a fair bit of time in the workshop.

More time spent in the Garage Workshop Crawl Space Access Hatch and Fan
The crawl space access hatch & fan we made 10 years ago had started to rot. My first project was to build a replacement.
We wanted the new access hatch/fan to stay in place all year round, unlike the previous fan, which had to be put away each winter because we couldn’t seal it. I also wanted to stop the fall leaves getting into the fan, and for it to have a flat top strong enough to take my weight.
This is the result.

Crawl Space Access Hatch and Fan I couldn’t buy a 4′ x 4′ board ⅛” thick, which is what I wanted to use as the sub-base to mount the fan on. There was no thin board in stock, so I had to use a thicker board which has resulted in the cover being a bit heavier than I’d planned.
It all fits nice and snugly and the screening should keep the leaves (and bugs) out. The whole thing lifts up for access to the crawl space, though I will admit it is heavier than I hoped – Typical Gary over-engineering. I put a lot of paint on it so I’m hoping it’ll last longer than the previous cover which was rather hastily put together during one of my visits.
A Desk for Alek

The finished desk all cleaned and polished Thursday Alek and Ginger went to Restore and came back with a desk drawer unit and a vanity panel. I was asked if I could turn the two bits into a desk for Alek.
I was going to buy some new lumber and metal brackets. However, I realized I ought to have enough bits and pieces hanging around to do the job (Added bonus – more workshop decluttering).
I turned this into a challenge to complete the entire job using only materials I had on-hand.
I found enough lumber but I was struggling to come up with metal brackets and plates to join the bits together. Checking the drawer unit I discovered it had seven brackets to secure the desktop – so I removed three of them. For the metal plates, I used an old hinge – cutting off the hinge part and grinding it down square.
The vanity panel had adjustable feet, which I removed and fitted to the new desk legs. The desktop panel wasn’t as deep as the drawer unit so I made a backstop to fill (most of) the difference. I painted the whole lot with some black paint we had leftover from the Bed Project.
-
Old Self: Portrait of the Artist as He Will (Not) Be. Variation #2

A lot of people say that they find these hyper-realistic figures spooky. I found them interesting. Much more disturbing for me was the way the figure is ‘cut off’.
 Be. Variation #2") ld Self: Portrait of the Artist as He Will (Not) Be. Variation #2. Copyright © 2017 Gary Allman, all rights reserved.
ld Self: Portrait of the Artist as He Will (Not) Be. Variation #2. Copyright © 2017 Gary Allman, all rights reserved. Be. Variation #2") ld Self: Portrait of the Artist as He Will (Not) Be. Variation #2. Copyright © 2017 Gary Allman, all rights reserved.
ld Self: Portrait of the Artist as He Will (Not) Be. Variation #2. Copyright © 2017 Gary Allman, all rights reserved.Old Self: Portrait of the Artist as He Will (Not) Be. Variation #2. Artist: Evan Penny. Crystal Bridges Museum of American Art.
-
Crystal Bridges Museum Architecture (Color)

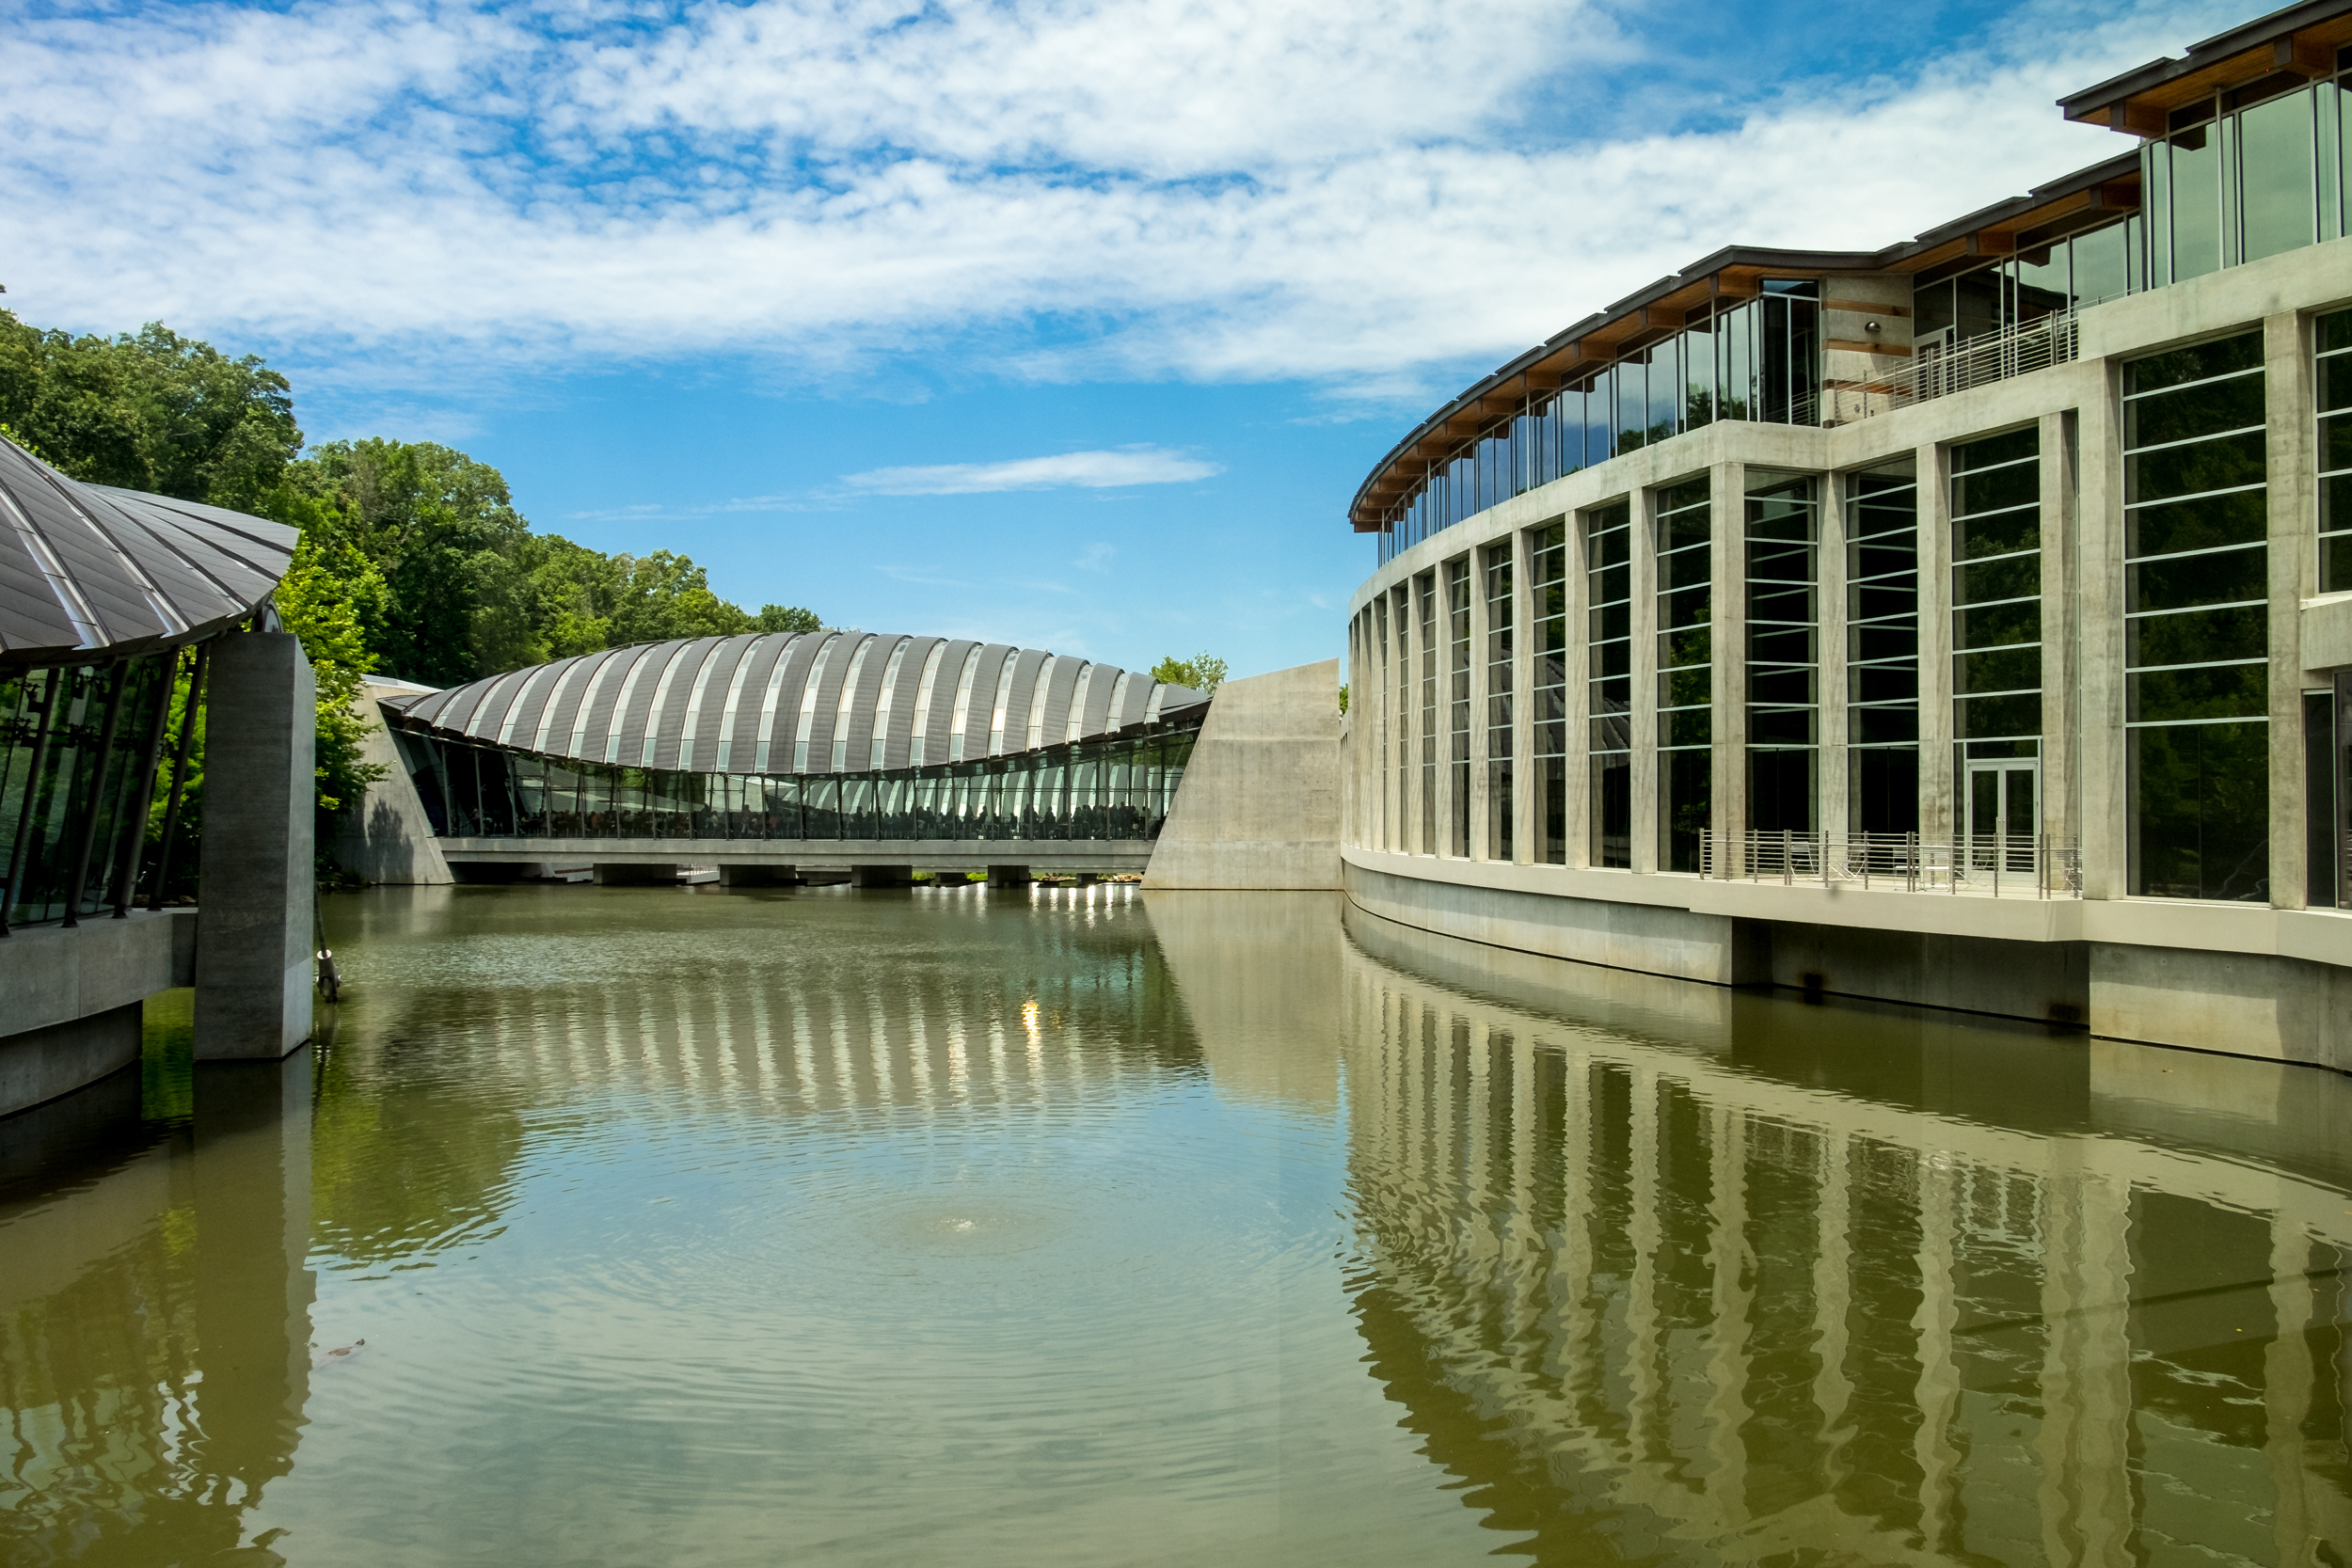
I had not done any research prior to visiting Crystal Bridges – I was completely blown away by the architecture – these are the color versions of the pictures. And here are the back and white versions. Downstream. Copyright © 2017 Gary Allman, all rights reserved.
 Crystal Bridges Museum of American Art. Copyright © 2017 Gary Allman, all rights reserved.
 Crystal Bridges Museum of American Art. Copyright © 2017 Gary Allman, all rights reserved.
 Crystal Bridges Museum of American Art.
 -
Crystal Bridges Museum Architecture (black and white)

Crystal Bridges Museum of American Art.Copyright © 2017 Gary Allman, all rights reserved. I had not done any research prior to visiting Crystal Bridges – I was completely blown away by the architecture.
 Crystal Bridges Museum of American Art. Copyright © 2017 Gary Allman, all rights reserved.
 The Way In – Crystal Bridges Museum of American Art. Copyright © 2017 Gary Allman, all rights reserved.
 Crystal Bridges Museum of American Art. Copyright © 2017 Gary Allman, all rights reserved.
 Crystal Bridges Restaurant – External View. Copyright © 2017 Gary Allman, all rights reserved.
 Walkway. Copyright © 2017 Gary Allman, all rights reserved.
 Twentieth Century Art. Copyright © 2017 Gary Allman, all rights reserved.
 -
Chihuly – In the Gallery + In the Forest

Program. Friday Ginger asked if I fancied going to Crystal Bridges with Carol & Jim Saturday. I said yes, glad to know I was delaying work on an item on my ‘honey-do’ list – building a new crawl space fan housing.
We’ve been meaning to go to Crystal Bridges for ages, but it’s never happened. We were both very impressed. Me, with both the art and the architecture. Now we’re looking to go again, but hopefully on a less busy day. According to the staff we went on an attendance record-breaking day. This was a bonus in some ways – the restaurant would not have looked as good if it had been empty, but it also meant that there were a lot of people to get in the way of pictures. I decided to go with the flow and make the people a part of my photographs.
And of course, there was a Chihuly Exhibition and this post features all the pictures I took of the Chihuly exhibits.
 Fire Orange Baskets – Dale Chihuly. Copyright © 2017 Gary Allman, all rights reserved.
 Rotolo – Dale Chihuly. Copyright © 2017 Gary Allman, all rights reserved.
 Rotolo – Dale Chihuly. Copyright © 2017 Gary Allman, all rights reserved.
 Rotolo – Dale Chihuly. Copyright © 2017 Gary Allman, all rights reserved.
 Calendula Persians – Dale Chihuly.Copyright © 2017 Gary Allman, all rights reserved.
 Azure Icicle Chandelier – Dale Chihuly. Copyright © 2017 Gary Allman, all rights reserved.
 Niijima Floats on Crystal Pond – Dale Chihuly. Copyright © 2017 Gary Allman, all rights reserved.
 Turquoise Reeds – Dale Chihuly. Copyright © 2017 Gary Allman, all rights reserved.
 Neodymium Reeds – Dale Chihuly. Copyright © 2017 Gary Allman, all rights reserved.
 Sole D’oro – Dale Chihuly. Copyright © 2017 Gary Allman, all rights reserved.
 Sole D’oro – Dale Chihuly. Copyright © 2017 Gary Allman, all rights reserved.
 Red Reeds – Dale Chihuly. Copyright © 2017 Gary Allman, all rights reserved.
 Fiori Boat – Dale Chihuly. Copyright © 2017 Gary Allman, all rights reserved.
 Squero Di San Trovaso Chandelier – Dale Chihuly. Copyright © 2017 Gary Allman, all rights reserved.
 Squero Di San Trovaso Chandelier & Campiello Barbaro Chandelier – Dale Chihuly. Copyright © 2017 Gary Allman, all rights reserved.
 Campiello Barbaro Chandelier – Detail – Dale Chihuly. See if you can spot Ginger and I in this picture. Copyright © 2017 Gary Allman, all rights reserved.
 Campiello Barbaro Chandelier – Dale Chihuly. Copyright © 2017 Gary Allman, all rights reserved.
 -
Crystal Bridges Restaurant – ‘Eleven’

Crystal Bridges Restaurant – ‘Eleven’ According to the staff person we spoke to, we chose to visit on a record-breaking day for the museum. It was very busy.


