-
Wall Drawing #880: Loopy Doopy

Wall Drawing #880: Loopy Doopy. Copyright © 2017 Gary Allman, all rights reserved. Yes, the colors really are that bright.
In fact, it was quite difficult to look at, and walking past it might make your head spin!
Wall Drawing #880: Loopy Doopy (orange and green). Artist: Sol LeWitt (1928 – 2007). Crystal Bridges Museum of American Art.
 Walkway. Copyright © 2017 Gary Allman, all rights reserved.
") Loopy Doopy with a touch of Ginger. Copyright © 2017 Gary Allman, all rights reserved.
Loopy Doopy with a touch of Ginger. Copyright © 2017 Gary Allman, all rights reserved.") Artist: Sol LeWitt (1928 – 2007). Crystal Bridges Museum of American Art. Copyright © 2017 Gary Allman, all rights reserved.
Artist: Sol LeWitt (1928 – 2007). Crystal Bridges Museum of American Art. Copyright © 2017 Gary Allman, all rights reserved. -
Twentieth-Century Art

Twentieth-Century Art Unfortunately, this gallery was closed. It made up for it by making a great picture though.
Crystal Bridges Art Museum, Arkansas.
-
The Bubble

The Bubble I couldn’t get the camera to brace for a long exposure in portrait orientation (I’ve since worked out I need to rotate it until the eyepiece is against the wall / corner, which is a bit awkward to use). So I went for another wide shot showing the museum’s visitors.
The Bubble. Artist: Harriet Whitney Frishmuth (1880 – 1980). Crystal Bridges Museum of American Art.

-
Sappho – Alone in the crowd

Sappho. Copyright © 2017 Gary Allman, all rights reserved. Art galleries and museums are often dimly lit places. Crystal Bridges Museum of American Art is no different, and working in the dark provides challenges and rewards. I came to Crystal Bridges hoping to be inspired, I was.
I wanted to capture the timelessness of the sculpture juxtaposed with the transient passage of the visitors, so I opted for a very long exposure. Angles were limited by where I could find a wall to brace against (tripods not permitted). This is a 3.2 second exposure. It took several shots to get ‘the one’ as I had no way to predict where people would go and what they would do while I was taking the picture.
‘Chimping’ the photo, I was so pleased with it, I knew I’d already got my ‘picture of the day’.
Here are a few of the ‘runners up’.

Sappho. Copyright © 2017 Gary Allman, all rights reserved. 

By the way, do I need to mention yet again how much I love my Fujifilm X-E2s camera?
-
Late Night Self Portrait

I’ve not taken a self-portrait in a while – so it is time to redress that situation.
-
Leatherman Skeletool CX

Leatherman Skeletool CX Copyright © 2017 Gary Allman, all rights reserved. My new everyday carry knife / multi-tool.
The Leatherman Skeletool CX weighs less than my Milwaukee Fastback, or Swiss Navy knife. It has a carabiner and pocket clip – which was a must-have for me. The tools include pliers, side cutters, screwdriver (Phillips and flat bits) and, of course, a bottle opener.
The only tools I miss from my Swiss Navy knife are the marlinspike, tweezers, and toothpick.
I like how the blade can be deployed and put away single-handed. I’m also impressed so far with the build quality. Though, it is all a little tight at the moment. We’ll see how it frees off with time.
Update 2024
The Leatherman Skeletool CX was a bad choice. I stopped carrying it regularly in 2019. The pocket clip doesn’t work well, it fell out of my pocket more times than I’d care to mention, damaging the frame so that the screwdriver bits no longer hold in place. Its tools are limited, and it turned out to be heavier than the Swiss Navy knife. Overall, it is a nice knife, but it just isn’t as practical or useful as my now 25+ year old Swiss Navy knife, which is my knife of choice when backpacking, the tools it has, are for me, the most useful and practical. The Milwaukee Fastback has become my everyday carry.
-
Small Product Photography Set-up in a Closet (Our ‘photo closet’)

Overhead camera mount. Copyright © 2017 Gary Allman, all rights reserved. Back in June Ginger moved her studio to another of the bedrooms. She asked me to build a small product photo studio in the room’s closet. Below the photography area I fitted shelves to either side and there is room for two of her wheeled carts to fit in the middle. I also added another higher shelf – mainly to fix the lights to. We’ve bought some new LED lights with adjustable brightness and color. At the moment I’m not convinced that they are bright enough. We are going to add some black curtains to the walls so we can adjust the reflections and highlights.
Update
The photo closet worked well, but the space was too small. We replaced the photo closet with a new ‘photo space‘ in another room in 2023.
Some sample images


Then, Ginger asked if I could add an overhead camera mount to the ‘photo closet.’ After some thought, I came up with this arrangement, which utilizes a drawer slide and a repurposed tripod head.
The remains of the tripod didn’t go to waste. I fitted a wooden top-plate to it, and it can be used to hold an additional light.

Close-up showing the drawer slide. Copyright © 2017 Gary Allman, all rights reserved. -
My EDC – Everyday Carry

My EDC – Everyday Carry 
Same picture in color It seems that posts about Everyday Carry are all the rage online at the moment. Either that, or maybe Google is just targeting me with them. Whatever, I thought I’d jump on the bandwagon and produce my own EDC list. This is what I tend to carry around, or keep close to hand when I’m at my desk.
Clockwise from top left:
- The Ridge wallet
- Seiko Divers’ Watch
- Leatherman Skeletool CX
- Zippo lighter with Vector Thunderbird butane torch insert
- Fitbit Flex 2
- My journal
- Carabiner key holder with re-chargeable flashlight and Moo card holder
- Beretta PX4 Storm Compact 9mm
- Not shown: Moto G4 phone.
-
Cellphone Stand

A nice, simple project. I made three cellphone stands, one for Ginger, one for my nightstand and one for my desk. It took a couple of prototypes to get the depth just right so that the fingerprint sensor can still be used without the phone falling out of the rest.
-
Procrastinating In The Workshop

There are lots of other things I could be doing, like yard work.
Instead, I’ve chosen to make three cellphone stands and a couple of bench rollers.
It’s amazing the number of tools needed and the amount of mess created even for the smallest of projects. Both projects were completed, and no yard work was done. That’s at least a partial result, right?
My last project of the day was to declutter the workshop a little bit by finally putting bases on the bench rollers I’ve had for years.

Tools For A Simple Project It’s surprising that there are so many tools needed for the simplest of projects. All I did was cut a slot in some decorative wood blocks to create some desk / nightstand cell phone holders.
- Mallet – to hammer the bench stops into place
- Big Level – straight edge to line up all the pieces for marking
- Ear defenders – hearing protection while cutting & vacuuming
- Set Square – I just used the rule for a straight edge
- Quick Square – marking / measuring
- Sandpaper – finishing
- Micrometer – depth and width setting
- Chisel – cleaning up cuts
- Pencil – Marking.
Not shown:
- Pry-bar – to get the bench stops out again!
- Compound Miter saw – 15° slot cutting
- Shop Vac. – dust control & clean-up
- Compressor / air tank – dusting off
- Paint Brush – final finishing
And that moment when you go to get your good paintbrush …
… and find that a teenager has been using it. -
Paper Napkins

Paper Napkins. Copyright © 2017 Gary Allman, all rights reserved. Earlier today the light on the kitchen table caught my eye,
and I wanted to take a picture but I was too busy. Fortunately the sky has been heavily overcast all day, when I stopped for lunch it was still looking good and I grabbed a few pictures.
To achieve the picture I wanted only some simple edits were needed: some slight straightening, warming the light a little, and cropping and adding a vignette to draw the viewer into the picture.
-
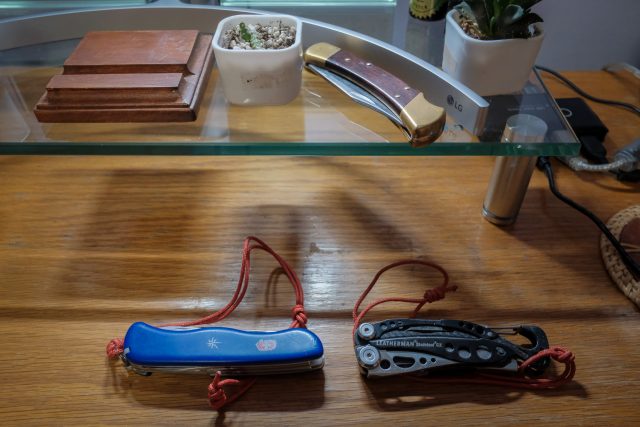
Function vs Form (II) — Knives

Function vs Form (II) — Knives. Copyright © 2017 Gary Allman, all rights reserved. When I first wrote a few thoughts about Function vs Form I used my lighters as an example. This time I’ve been pondering over the knives I’ve been using for the past 30-odd years.
I first started regularly carrying a knife back in the mid-eighties. At the time I was doing a lot of drawing and sailing, and I carried the immensely handy Bosun’s Mate Knife, great for dealing with ropes and shackles, and sharpening pencils. I lost my first one, and there were some quality problems with the replacement – the blade had a very sloppy fit, which led to it being replaced.
We spent this past weekend with Jim & Carol, and while we were there Jim gave me a Buck 110 knife (top). It’s a classic knife that set the bar for folding knives to come.
The pros on the Buck are obvious, its looks and function; it is a thing of beauty, and it works. The cons are its weight and (for me) the lack of a pocket clip. I like my knife clipped into my pocket.
The middle knife is my trusty Swiss Navy Knife (officially a Victorinox Skipper). It’s great, and the wear on it hints at its history of many years of everyday use. As much as I love it, I hate its serrated blade, and it doesn’t have a clip to hold it in my pocket – hence the lanyard. I’ve lost it in a lake once, and had to resort to snorkeling to recover it. The lanyard is to make sure that doesn’t happen again.
My everyday carry was the Milwaukee Fastback (bottom). It’s a fantastic workhorse, and inexpensive to boot. It’s a knife you can afford to abuse and lose. The wear on the opening button gives testimony to its constant use.
I say that the Milwaukee ‘was’ my everyday carry. That is because I have a request in for a lightweight multi-tool – the Leatherman Skeletool CX, and, of course, I now have the Buck.
I’ve picked a multitool with a titanium frame, and a straight blade. It is light. It doesn’t include a marline spike, tweezers, or tooth pick (more’s the pity) – which the Swiss Navy Knife does, but I reckon I can manage without those in favor of pliers and cutters. The multi-tool does have a clip, so It’ll sit nicely in my pocket. And to my eye it looks good too.
Coming back to Function vs Form with my knives.
The Swiss Navy Knife beats the Milwaukee and Buck hands down on functionality, with its screwdriver blades, marlin spike, bottle and can opener, shackle tool, tweezers and toothpick. Depending on what tools I’ll be needing, I suspect it also beats the Leatherman Skeletool CX. But, for everyday carry I want a straight blade and pocket clip – the Swiss Navy Knife has neither.
Spoiler Alert
Conclusion? The Swiss Navy knife is an absolute winner in function, and not bad in form either.The Buck just feels right, and wood and brass wins out over a plastic grip any day. I can forgive the lack of a pocket clip for the Buck’s great looks and wonderful feel.
For the moment the Milwaukee Fastback and Swiss Navy Knife will be consigned to sitting on a shelf. When I get my multi-tool it will become my everyday carry, and the Buck will get pride of place on my desk. When I’m out backpacking or hiking the Buck will accompany me in my pack. Until I get the multi-tool the Buck will be my Everyday Carry.
2023
On my desk tonight – Buck 110 (Top), Swiss Navy (Left) and Skeletool CX (Right). After twenty plus years of use Hands down winner is the Swiss Navy knife, but I love the Buck and it has pride of place on my desk. Copyright © 2021 Gary Allman, all rights reserved. In 2020 I gave the Milwaukee knife to one of my daughters, and I recently bought an identical model I found on eBay in 2022.
The Leatherman Skeletool CX was a bad choice. The pocket clip is useless, its tools are limited, and contrary to my expectations, it is heavier than the Swiss Navy knife.
Overall, the Skeletool CX is a nice knife, but it just isn’t as practical or useful as my now nigh on thirty-year-old Swiss Navy knife. The blade on my Swiss Navy knife has been sharpened so much now it is no longer serrated. It is my knife of choice when backpacking, the tools it has, are for me, the most useful and practical. The Milwaukee Fastback has become my everyday carry. As for the Buck. I still love it, and it retains its pride of place in front of me on my desk. But it’s too heavy and lacking in options to take out backpacking where weight and multiple uses are paramount.
One point to note: all three of these knives lock open, which makes them illegal in many places. However, in my opinion, and from a user’s point of view locking open is essential.
Speaking of heavy knives, I recently (2023) was given this knife by my father-in-law.
Conclusion? The Swiss Navy knife is an absolute winner in function, and not bad in form either. The latest version has some rather iffy looking pliers too.
-
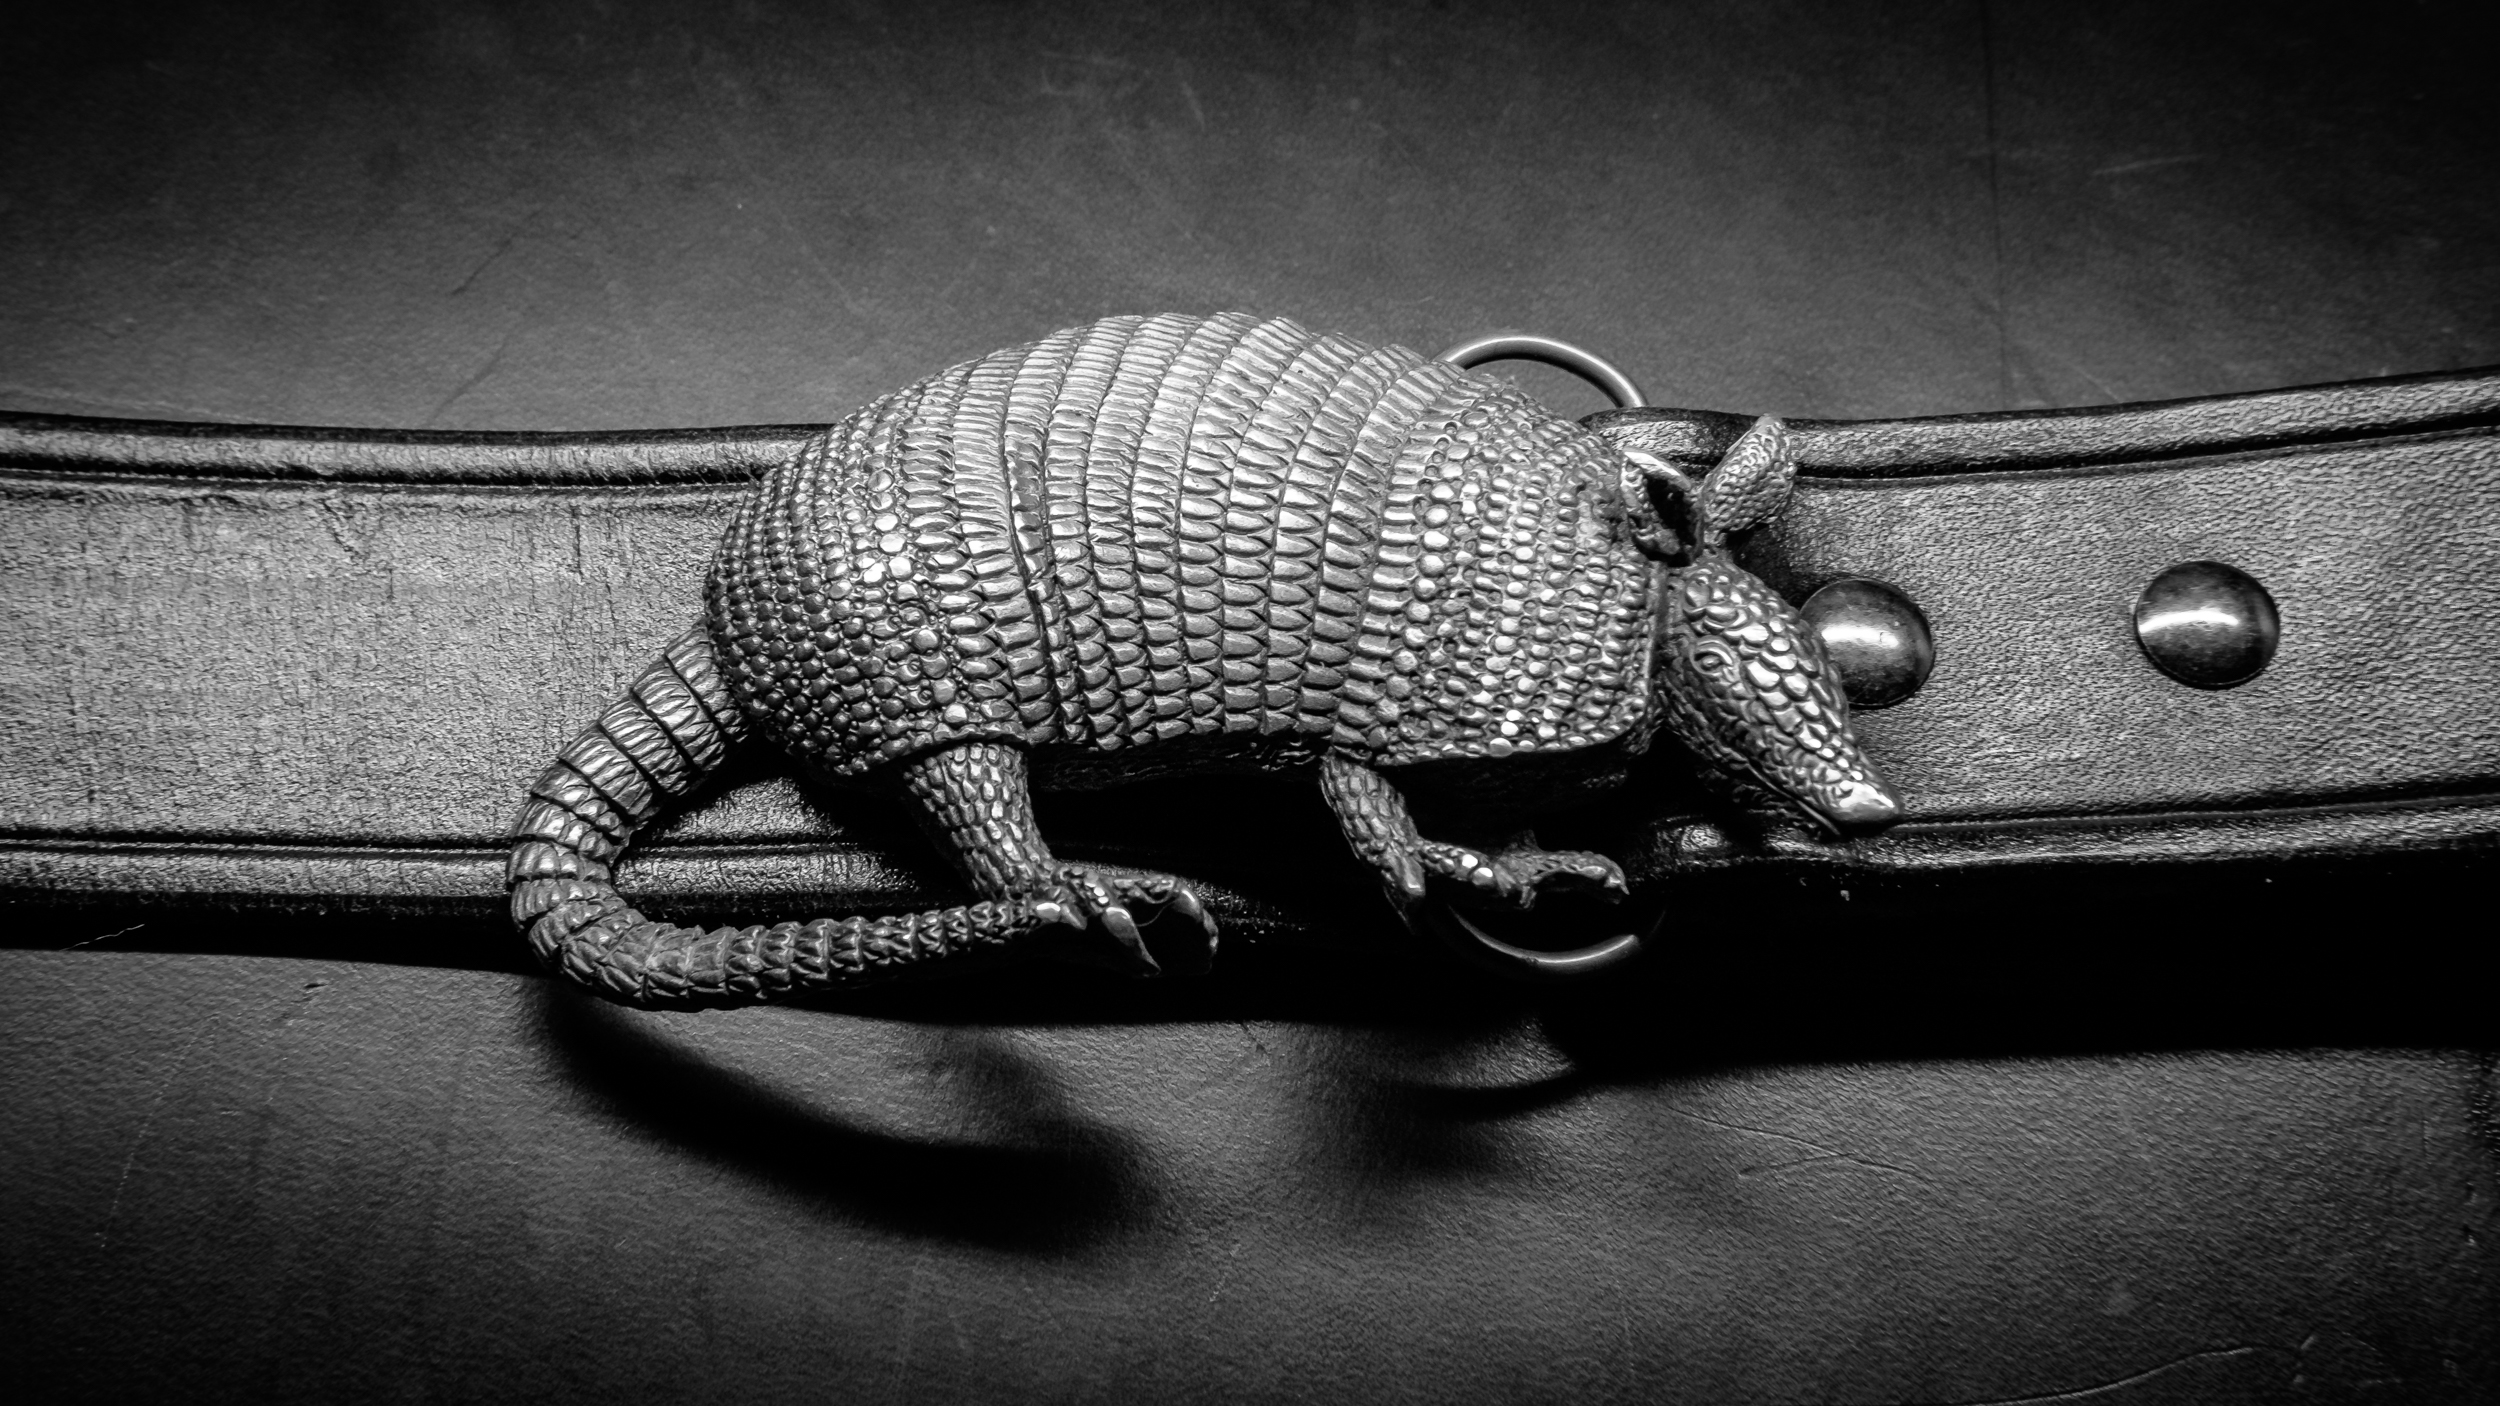
Armadillo Belt Buckle

Armadillo Belt Buckle. Copyright © 2017 Gary Allman, all rights reserved. During our Fathers’ Day weekend visit to Jim and Carol’s, Jim asked me if I wanted a belt with an armadillo Buckle. Well, actually I’m pretty sure he said arma-dildo but we’ll gloss over that.
Much to my surprise the belt fitted me, and an armadillo buckle is different to say the least! Jim called it the ugliest belt buckle he’d ever seen. Well, I’m up for a fashion challenge. Especially in the form a great talking point like this. So I went for it. I think it is brilliant. I just have to hope I don’t get run over (Carol says I’ll be fine if I don’t leap into the air in front of passing traffic).
Later: Thinking about the trouble I’m having with clones, an armadillo is a very good emblem/belt buckle to have.
-
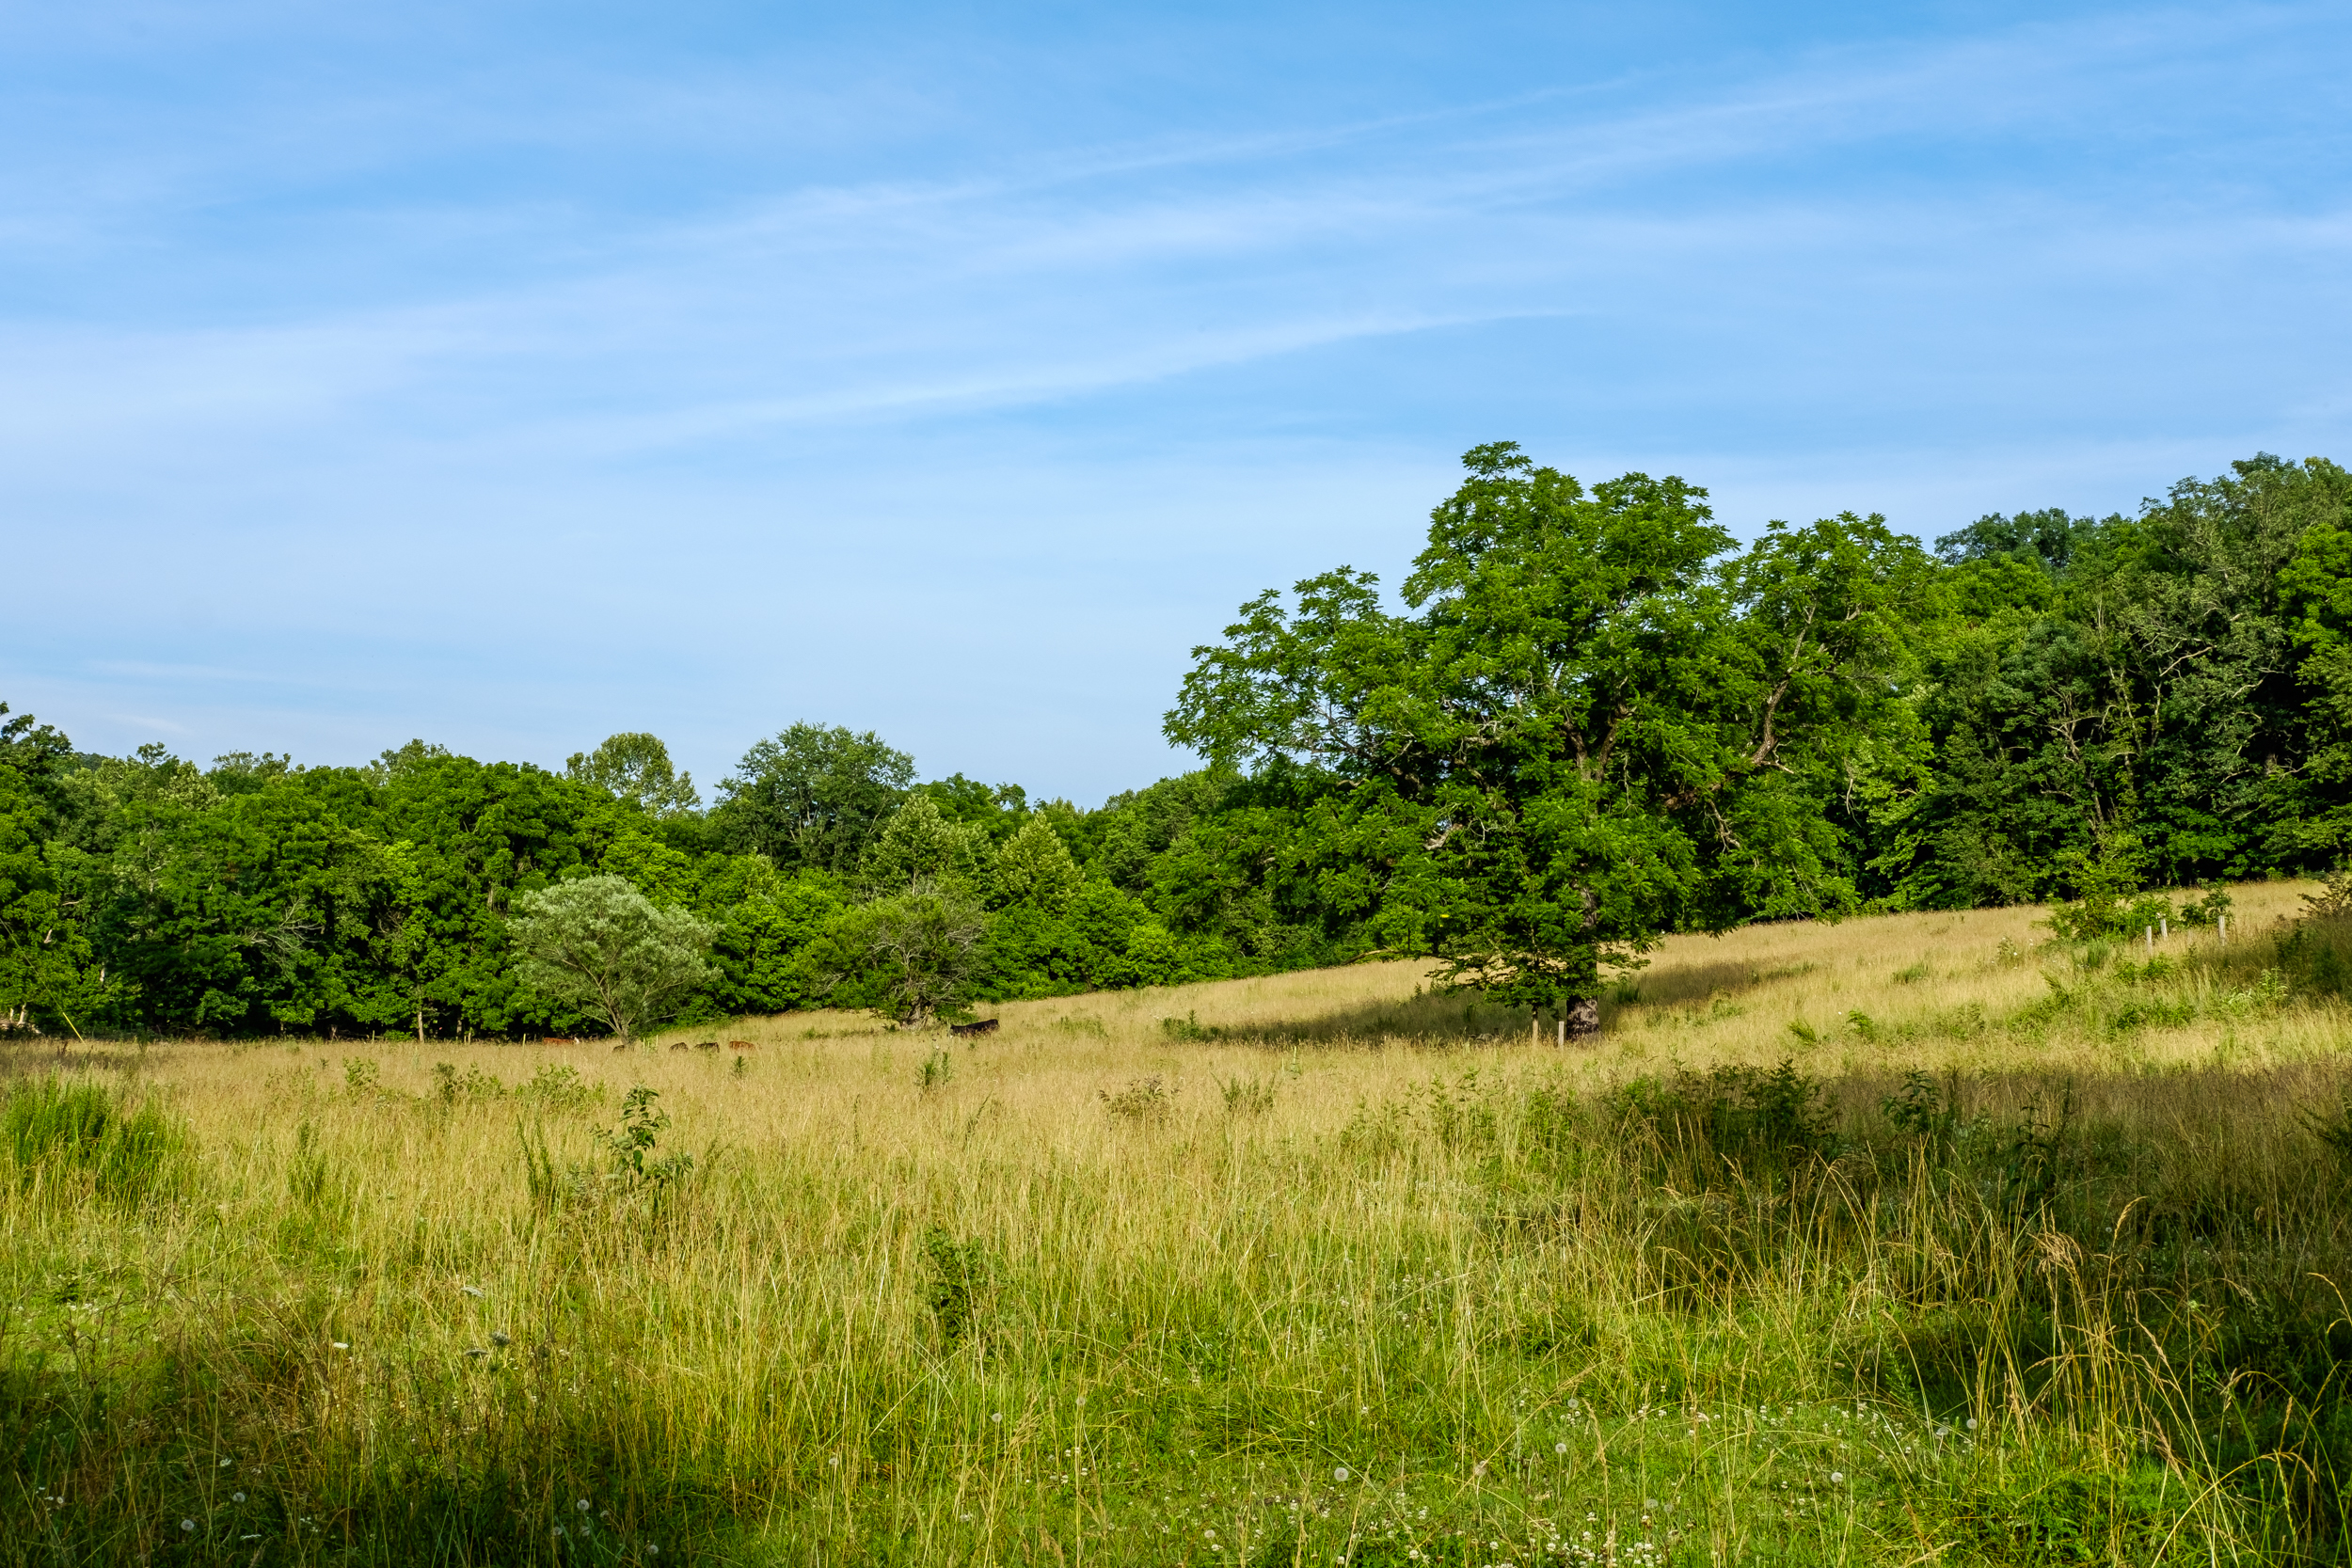
‘The Field’

‘The Field’. Copyright © 2018 Gary Allman, all rights reserved.
I asked Ginger what this field on her parent’s farm was called. Her answer? “Dunno, ‘The field?’” Okay. ‘The Field’ with added cowses (sic). -
Poking Around in Jim’s Workshop

Anvil. Copyright © 2017 Gary Allman, all rights reserved. A little bit of black and white workshop photography.
We’ve been promising to visit Carol & Jim for ages, but things just haven’t been working out. We finally managed to get a weekend free to go down and stay a couple of days. Of course that also means some photo opportunities. I’ve already posted pictures of Jim’s Pickup.
I love visiting Jim’s workshop, there’s always some new project going on and lots of things to see.
 Punches, Odds and Ends. Copyright © 2017 Gary Allman, all rights reserved.
 Drill Press. Copyright © 2017 Gary Allman, all rights reserved.
 -
Jim’s Pickup – Color

The prints have been delivered (July 2017) so now I can share the color versions of the pictures I took of Jim’s 1978 Chevrolet Scottsdale Pickup.


-
Jim’s Pickup – Black and white

Jim’s short wheelbase, 400″ block, 1978 Chevrolet Scottsdale Pickup, just back from the shop after a new paint job.
He asked if I could take some pictures, and these are my favorites converted to black and white.


-
Flower Frog

Flower Frog. Copyright © 2017 Gary Allman, all rights reserved. I had not heard of the term ‘Flower frog’ until a few weeks ago when one was suggested by Ginger as a good way to store / hold / display fountain pens, whereas normally a flower frog holds the stems of flowers.
Ginger found this one today in a flea market. Unfortunately the barrels of my pens are too thick to be able to use it. I was, however, fascinated by the play of light on the glass.
-
Hibiscus – Color

Hibiscus – in color And the same picture in color …
When I noticed the sunlight dappling the flower I decided to take the picture, no matter how twee hibiscus flower pictures are.
Thinking about it; for a better shot I should have got the sunlight in the background behind the stamen.
-
Hibiscus – Black and White

Hibiscus – Black and White. Copyright © 2017 Gary Allman, all rights reserved. When I noticed the sunlight dappling the flower I decided to take the picture, no matter how twee hibiscus flower pictures are.
Thinking about it; for a better shot I should have got the sunlight in the background behind the stamen.